Post-tensioning holds up a large share of the bridges, parking structures, and concrete buildings in service today, yet the tendons doing that work sit hidden inside ducts and concrete. That’s what makes inspection difficult: by the time damage becomes visible at the surface, corrosion inside the duct is usually well advanced. Owners and engineers need a repeatable way to look inside the system before strength is lost. This guide walks through why tendon inspection matters, the warning signs worth chasing, the step-by-step field sequence, the testing methods available, and what to do once findings come back.
Why Does Post-Tension Tendon Inspection Matter?
Post-tensioned structures carry load through high-strength steel strands that are tensioned after the concrete cures. The system depends on three things staying intact: the strand, the anchorage, and the grout or grease that protects both. Inspection matters because losing any one of those layers puts the whole load path at risk, and none of them can be judged from the outside.
When an inspection does turn up section loss or a failed grout envelope, the question immediately becomes how quickly the protection system can be restored before the damage spreads further along the tendon. Firms like Freyssinet USA handle that stage as post tension cable repair, covering void grouting, anchorage rebuilding, and strand replacement on the same structures they assess. Keeping assessment and repair in one continuous sequence means inspection findings turn into a defined scope of work instead of a second round of investigation.
What Happens When Tendon Deterioration Goes Undetected?
Corrosion in a post-tensioning tendon reduces the cross-section of the strand, which lowers the effective prestress force in the member. As prestress drops, cracks widen, deflections grow, and the structure starts behaving more like unreinforced concrete than a post-tensioned one. Because a single tendon can serve a full span or bay, a localized failure can shift load onto neighboring elements faster than most owners expect. Early detection keeps the problem in the realm of grout injection and localized repair rather than tendon replacement.
Which Structures Depend Most on Post-Tensioning Integrity?
Bridges, parking decks, stadiums, and post-tensioned building slabs all rely on tendons that are exposed to moisture and chlorides. Parking structures are especially vulnerable because deicing salts drip through joints and cracks directly onto anchorages and duct paths. Coastal and marine structures face the same chloride exposure from salt spray. Water and industrial facilities add chemical exposure to the list, which accelerates the same corrosion mechanisms.
What Are the Warning Signs of Post-Tension Tendon Distress?
Warning signs rarely announce themselves as tendon problems. They show up as staining, spalling, or unexpected movement, and it takes an experienced eye to trace them back to the post-tensioning system.
Which Visual Indicators Should Inspectors Look For?
The first pass is always visual, and the anchorage zones deserve the closest attention because that’s where water collects and where strand ends terminate. Inspectors look for rust staining bleeding from anchor pockets, cracked or missing pocket patches, spalled concrete over duct paths, and efflorescence following the line of a tendon. Bulges or blisters along a slab soffit can indicate corrosion products expanding inside a duct. On bridges, staining at low points of a draped tendon profile is a common tell because that’s where water settles.
How Do Grout Voids and Water Ingress Signal Corrosion Risk?
Grout is the tendon’s primary corrosion protection, so any gap in it is a gap in the defense. Voids form when grout bleeds, shrinks, or was never fully placed, and they usually sit at high points in the tendon profile where air collects. Once a void exists, water entering through a cracked anchor pocket or a leaking joint has somewhere to sit against bare steel. Free water or soft, chalky grout recovered during an inspection is treated as an active corrosion risk, not an incidental finding.
What Do Cracking Patterns Reveal About Tendon Condition?
Cracking tells you where the load path is changing. Transverse cracks in a slab that widen over time suggest a loss of effective prestress in that band. Longitudinal cracks tracking a duct line often mean corrosion products are expanding inside the duct. Cracks radiating from an anchorage point to local distress at the anchor head or bearing plate rather than along the tendon length. Mapping crack patterns before any testing helps target where invasive work will actually be useful.
How Do You Inspect Post-Tension Tendons Step by Step?
A tendon inspection works from the least invasive information toward the most invasive, so each step narrows the search area for the next one.
Step 1: What Structural Records and Drawings Do You Need First?
Inspection starts in the document set, not on the deck. Engineers pull the original shop drawings to establish tendon layout, duct profile, anchorage locations, strand count, and the post-tensioning system used, since anchorage details and duct materials vary widely by era and supplier. Grouting records, as-built revisions, and past repair reports tell you where problems have already appeared. Without a tendon layout, field crews are drilling blind, and a misplaced core can damage the very strand being investigated.
Step 2: How Do You Plan Access and Zone the Structure?
Access planning determines what the inspection can realistically cover. Depending on the structure, crews work from scaffolding, access platforms, or hydraulic lifts, and each option carries its own clearance and load constraints that need to be resolved before mobilization. The structure is then divided into inspection zones based on exposure, drainage patterns, and tendon layout, so that sampling is representative rather than convenient. Zones with the worst exposure history get the highest sampling density.
Step 3: What Does the Visual and Sounding Survey Cover?
The field survey combines close visual examination with hammer sounding and chain drag to find delaminated concrete over ducts and anchor pockets. Inspectors document every anchorage they can reach, since anchorage condition is the single best early indicator of system health. Findings are logged by zone with photographs and measured locations, which creates the baseline for future inspection cycles. Anything that sounds hollow or shows moisture becomes a candidate for testing.
Step 4: When Do You Move to Invasive Verification?
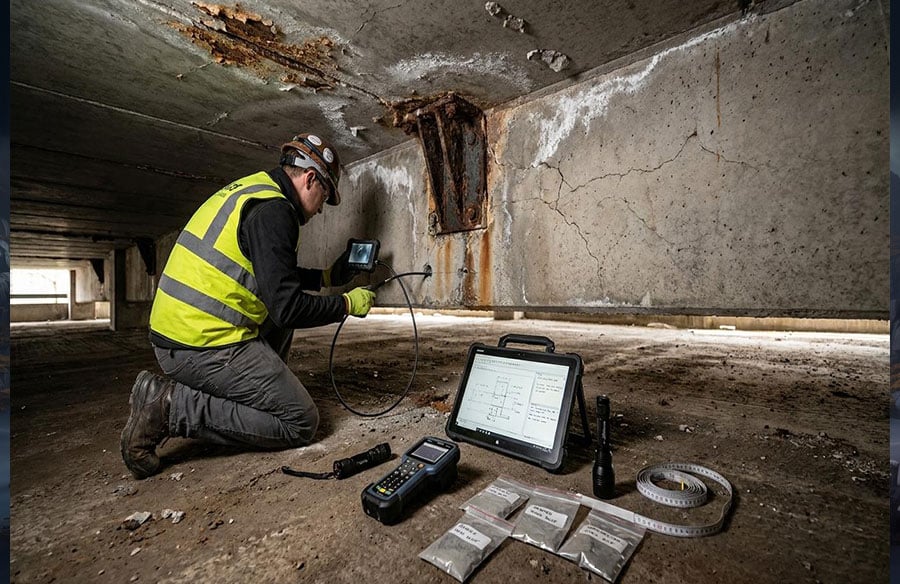
Invasive work is justified once the survey identifies specific suspect locations, because opening a duct is the only way to confirm strand condition directly. Crews remove anchor pocket patches, drill small inspection ports into ducts at high points, or carefully expose short lengths of duct to allow direct observation. Each opening is sealed and restored with materials compatible with the original system. The goal is the minimum number of openings that still answers the engineering question.
Which Testing Methods Apply to Post-Tension Tendons?
No single method sees everything, so tendon inspection normally layers 2 or 3 techniques and cross-checks the results.
What Can Nondestructive Testing Detect?
Nondestructive methods map the system and flag anomalies without cutting into it. Ground penetrating radar locates duct paths and reinforcement so drilling can proceed safely. Impact echo and ultrasonic methods help identify voids and delamination behind the concrete cover. Half-cell potential and resistivity surveys indicate where corrosion activity is likely, and vibration or force measurement techniques can estimate remaining tension in accessible tendons. These methods narrow the field, but they infer condition rather than show it.
How Do Borescope and Duct Opening Inspections Confirm Findings?
Direct observation converts probability into fact. A borescope inserted through a small port shows grout condition, void extent, standing water, and the surface of the strand itself. Inspectors grade what they see, from sound grout in full contact with the strand through to bare wire with section loss. Where a borescope view is inconclusive, a wider opening allows visual and tactile assessment of the strand. Because these openings are localized, they can be placed at the specific high points and anchorages that earlier steps flagged.
Why Does Grout and Corrosion Sampling Matter?
Samples explain the mechanism behind the damage. Grout is tested for chloride content, pH, sulfate, and moisture, since a depassivated or contaminated grout will keep corroding strand even after water intrusion is stopped. Corrosion product sampling helps distinguish surface oxidation from active pitting, and pitting matters far more because it concentrates section loss at a point. Together with the borescope grading, sampling supports a defensible estimate of remaining capacity and drives the repair strategy.
How Often Should Post-Tension Tendons Be Inspected?
Inspection frequency follows exposure and consequence rather than a single fixed interval. Structures in aggressive chloride environments, such as parking decks treated with deicing salts and coastal bridges, warrant more frequent cycles than sheltered interior slabs. Anchorage zones and known void locations should be revisited on a shorter cycle than the rest of the structure because they deteriorate first. Certain events reset the schedule entirely: water intrusion after a joint or waterproofing failure, unexplained cracking or deflection, a change in loading or occupancy, and any repair that opened the tendon system. Owners running an asset management program typically pair periodic inspection with monitoring so that trends, not single snapshots, drive decisions.
What Happens After the Inspection Findings?
An inspection is only useful if it produces a ranked action plan. Findings need to be converted into risk levels and matched to the repair techniques that fit each condition.
How Do You Prioritize Repairs by Risk?
Prioritization weighs the severity of section loss against the structural role of the affected tendon. A tendon with confirmed pitting in a primary span carries more urgency than surface oxidation in a secondary element, even if the visible damage looks similar. Engineers also factor in whether the corrosion mechanism is still active, because stopping water ingress can buy time for lower-priority work. The output is a tiered plan: immediate structural action, scheduled repair, and monitored watch items.
Which Repair and Protection Options Follow an Inspection?
Repairs range from restoring the protection system to replacing load-carrying elements. Vacuum grouting fills voids and re-establishes an alkaline environment around the strand. Anchorage rebuilding and pocket resealing stop the most common water entry path. Where section loss is significant, external post-tensioning or strand replacement restores the lost prestress force, and structural strengthening can supplement capacity where replacement is impractical. Waterproofing, joint repair, and drainage correction should accompany any of these measures, because a repaired tendon in a wet environment will simply corrode again.
Key Takeaways for Post-Tension Tendon Inspection
Post-tension tendon inspection works because it is sequential: records first, then a visual and sounding survey, then nondestructive screening, then targeted openings that confirm what the earlier steps suspected. Anchorages and high points in the tendon profile deserve the most attention, since that’s where water and voids concentrate. Findings only create value when they are ranked by risk and tied to a repair plan that also fixes the water path. Treated as a recurring program rather than a one-time exercise, inspection is what allows owners to extend service life instead of managing emergencies.
Frequently Asked Questions About Post-Tension Tendon Inspection
Can You Inspect Post-Tension Tendons Without Damaging the Concrete?
Most of an inspection is nondestructive. Visual examination, sounding, ground penetrating radar, and electrochemical surveys leave the structure intact and are enough to identify suspect zones. Confirming strand condition, however, requires small localized openings or borescope ports, which are sealed and restored afterward.
How Long Does a Post-Tension Tendon Inspection Take?
Duration depends on structure size, access conditions, and how many locations need invasive verification. A single parking level with straightforward access can be surveyed in a matter of days, while a large bridge with staged access and extensive sampling runs considerably longer. Access setup often takes more time than the inspection itself.
Are Post-Tension Tendons Inspected the Same Way as Stay Cables?
No. Stay cables and post-tensioning tendons are different systems and are assessed differently. Stay cables are much larger, typically containing 10 to 127 strands per cable, and they carry high fatigue stress in both axial and bending directions, which requires specialized materials, anchorages, and fatigue-focused evaluation. Post-tensioning tendons typically contain 4 to 37 strands and are usually embedded in ducts inside concrete, so their inspection centers on grout condition, voids, and hidden corrosion.
Who Should Perform a Post-Tension Tendon Inspection?
Post-tension tendon inspection belongs to specialty engineering teams that combine structural assessment experience with hands-on knowledge of post-tensioning systems. Reading a duct layout, grading grout and strand condition through a borescope, and translating findings into remaining capacity all require familiarity with how these systems are built and how they fail. Teams that also execute the repairs can carry the diagnosis straight through to a workable scope.