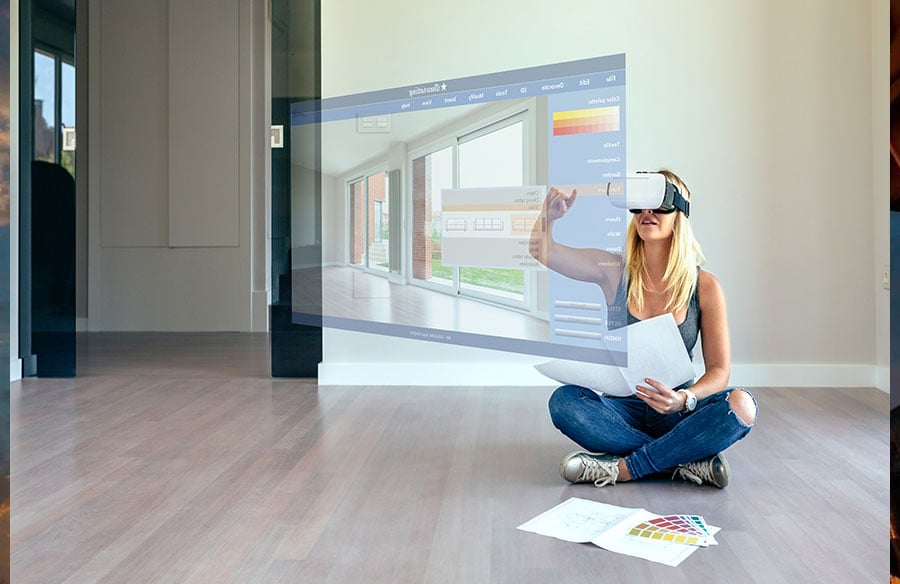
Home renovation rarely begins with construction. It usually begins with uncertainty.
A homeowner may know that a kitchen feels outdated but remain unsure whether the real problem is the cabinets, countertops, flooring, lighting, or the entire visual direction. Someone moving into an empty apartment may understand the room dimensions but still struggle to imagine how furniture will fit. A designer may receive a black-and-white floor plan that explains circulation clearly while communicating very little about atmosphere, materials, or how the completed space might feel.
These are not yet construction problems. They are visualization problems.
AI-assisted home design is becoming useful during this early stage—not because it replaces architects, interior designers, contractors, measured drawings, or technical documentation, but because it can turn vague ideas into visible alternatives that are easier to compare.
ImagineMyHouse is designed around this decision-making stage. Rather than treating redesign, cleanup, furniture removal, staging, floor-plan visualization, lighting, and focused editing as isolated tricks, it brings them into one practical workflow that begins with the home that already exists.
The most useful workflow is not simply to upload an image and ask AI to “make it beautiful.” A more reliable process begins with the actual room, prepares the source image, explores broad directions, refines individual decisions, and distinguishes presentation visuals from construction information.
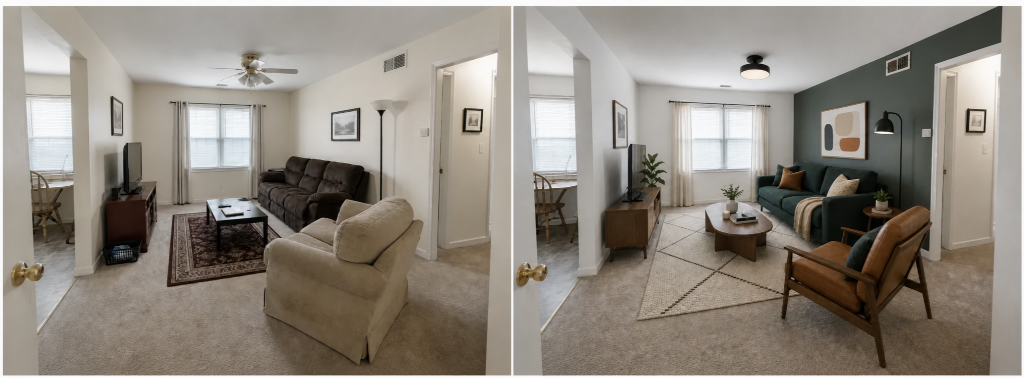 Starting with the existing room makes it easier to compare an AI-generated design direction with the space that will actually be renovated.
Start With the Home That Already Exists
Traditional inspiration boards usually begin with photographs of other people’s homes. They are useful for establishing mood, but they do not answer the most important question:
What would this direction look like in this particular room?
The ceiling may be lower. The windows may be narrower. A doorway, radiator, column, fireplace, or awkward wall may affect every practical design decision. A concept that works in a large editorial photograph may feel completely different when applied to a compact bedroom or an ordinary apartment kitchen.
Photo-based visualization starts from those existing conditions.
A clear image of the real room gives the process a consistent reference: camera perspective, visible walls, openings, floor area, furniture scale, and light direction. ImagineMyHouse brings several related workflows together around this source material, including room redesign, visual cleanup, furniture removal, virtual staging, floor-plan visualization, lighting changes, and focused image editing.
The original photograph should remain available throughout the process. It becomes the control image against which each generated alternative can be assessed.
For a more useful source photograph:
- keep the camera level rather than tilting heavily upward or downward;
- show as much of the floor and main walls as possible;
- avoid extreme wide-angle distortion;
- use natural or evenly distributed light;
- reduce motion blur and heavy image compression;
- retain the unedited original for side-by-side comparison.
The starting photograph is not simply an upload. It is the visual evidence that prevents early concepts from becoming disconnected from the real space.
Decide Whether the Room Needs Decluttering or Emptying
Everyday rooms are rarely photographed in presentation condition.
Clothes, delivery boxes, toys, papers, dishes, cables, and personal belongings can obscure the permanent elements that matter during design planning. They can also make it difficult for an image-generation system to distinguish between intentional furniture and temporary visual noise.
However, removing clutter and removing furniture are not the same task.
A decluttering workflow removes loose objects while preserving primary furniture. The sofa, bed, dining table, cabinetry, and major room structure remain visible, while clothes, boxes, papers, cables, dishes, and scattered personal items are cleared away.
A furniture-removal workflow goes further. It removes movable furnishings and reconstructs the floor and wall areas that were previously hidden, creating a clean empty room that can be used for space planning or virtual staging.
In ImagineMyHouse, Declutter Room and Remove Furniture are treated as separate operations. That distinction keeps the intended result clear: one preserves the main furniture while removing everyday mess, and the other creates an empty architectural base.
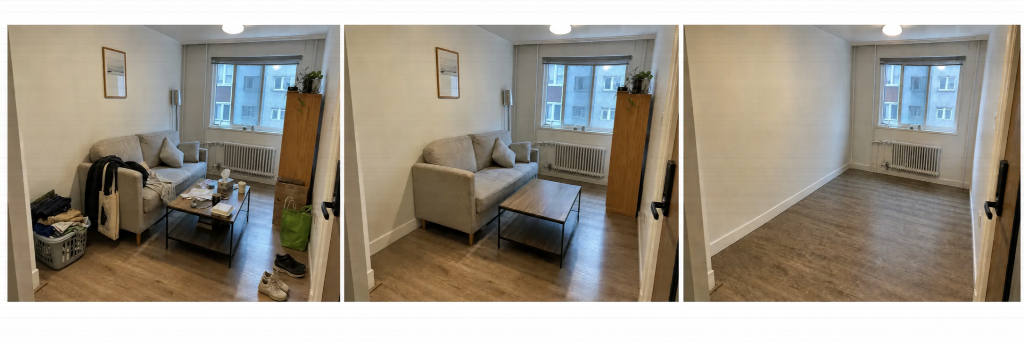 Decluttering preserves the existing furniture, while furniture removal creates an empty-room base for planning or virtual staging.
Choosing the correct operation matters. A homeowner testing a new wall color may only need the room decluttered. A real estate agent preparing a dated property photo may want to remove all existing furniture before applying a new staging style.
Treating the two tasks separately also makes the results easier to evaluate. If too many transformations occur in one step, it becomes difficult to identify whether an unexpected result came from cleanup, redesign, or staging.
Compare Broad Directions Before Refining Details
Once the source image is clear, the next step is to explore several broad design directions.
The same room might be tested in Warm Modern, Scandinavian, Japandi, Coastal, Contemporary, or Traditional styles. A kitchen could be compared with natural oak cabinetry, a dark painted finish, or a lighter neutral direction. An exterior could be explored with alternative siding, masonry, roofing, trim, and entry colors.
At this stage, the images should not be treated as final proposals. Their purpose is to expose preferences and identify combinations worth developing.
A useful comparison keeps the basic conditions consistent:
- Start with the same source photograph.
- Change one broad design direction at a time.
- Keep the room’s intended purpose unchanged.
- Compare furniture scale, materials, light, and visual balance.
- Record which elements work rather than immediately selecting one complete image.
A homeowner who initially requests a “modern living room” may discover that the preferred result is not the most minimal version, but the one with warmer materials and softer lighting. Someone planning a dark kitchen may realize that only the lower cabinets should change.
The value of the visualization is not that it makes the decision automatically. It makes the differences visible enough for a better decision to be made.
Refine One Decision at a Time
A complete redesign is useful for discovering a direction, but many renovation decisions are much narrower.
A homeowner may already like most of the room and only want to test whether:
- the lower kitchen cabinets should be navy or natural wood;
- one wall should use limewash instead of standard paint;
- oak flooring would make the room feel warmer;
- a pendant light should be replaced;
- one sofa should be exchanged for a lighter design;
- a countertop material works with the existing backsplash.
Generating another complete makeover can introduce unnecessary changes. A targeted editing workflow is more appropriate.
A focused editing instruction should identify three things:
- The target: the surface, object, or region to be changed.
- The requested result: the new color, material, object, or treatment.
- The preservation instruction: the surrounding elements that should remain recognizable.
For example:
Change the lower kitchen cabinets to dark navy with brushed-brass hardware. Keep the upper cabinets, countertop, backsplash, appliances, floor, lighting, and camera angle unchanged.
This is more useful than asking the system to “make the kitchen more luxurious.” The broader request leaves almost every visual decision open to interpretation. The focused instruction creates a comparison around one real renovation choice.
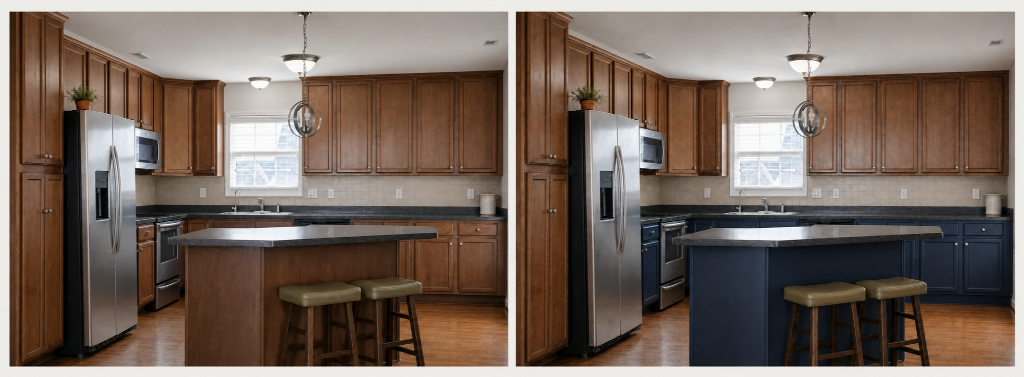 Targeted editing is most useful when the overall design direction is already established and only one material or object needs to be reconsidered.
Use Floor Plans and Room Photographs for Different Questions
Floor plans and room photographs communicate different kinds of information.
A floor plan is strongest when the question concerns:
- room relationships;
- circulation;
- door and window placement;
- furniture clearance;
- zoning;
- approximate spatial organization.
A room photograph is strongest when the question concerns:
- material character;
- color;
- furniture style;
- lighting;
- atmosphere;
- visual scale from a human viewpoint.
The two formats should support each other rather than compete.
A floor planner can be used to draw walls, place openings, arrange furniture, save layout alternatives, and export a readable plan. A plan visualizer can then turn a black-and-white drawing into a colored top view, furnished presentation plan, isometric concept, or architectural illustration.
A practical workflow may look like this:
- Draw or upload the source plan.
- Confirm walls, openings, and circulation.
- Create a colored or furnished visualization.
- Review individual rooms against photographs of the actual property.
- Refine specific rooms or materials separately.
- Return to the measured drawing before making technical decisions.
The plan controls spatial logic. The room image communicates experience.
An attractive visualization should never silently replace the technical source. Walls, dimensions, clearances, and openings must still be checked against the original plan.
Make Empty Rooms Easier to Understand
An empty room may reveal architecture clearly, but it often communicates scale poorly.
Without a bed, sofa, dining table, or desk, viewers may struggle to understand how the room will function. This is particularly relevant to property listings, rental presentations, renovation concepts, and newly completed developments.
Virtual staging can introduce proportionally appropriate furniture and decor to help explain how a vacant room might be used.
A staged image can help viewers consider questions such as:
- Can the living room accommodate both seating and dining?
- Is there enough space around a queen-size bed?
- Would a home office make the room feel crowded?
- Which furniture direction best suits the architecture?
- How might a currently vacant property feel when occupied?
For a furnished or outdated room, the cleaner sequence is usually:
remove existing furniture → verify the empty-room result → apply virtual staging → adjust lighting if needed.
The purpose is to communicate possibility, not to conceal the physical condition of the property. Virtually staged listing images should be disclosed clearly so viewers can distinguish presentation concepts from current reality.
What AI Visualization Should Not Decide
Fast visualization can create an illusion of certainty. A persuasive image may look resolved even when important technical questions remain unanswered.
AI-generated concepts should not be treated as authoritative sources for:
- structural alterations;
- load-bearing wall decisions;
- electrical or plumbing placement;
- building-code compliance;
- accessibility requirements;
- exact dimensions;
- final material specifications;
- construction details;
- cost estimates;
- product availability.
Generated images may also alter details unintentionally. A doorway can shift, a window may change proportion, a furniture item may be incorrectly scaled, or a material transition may not be physically buildable.
Every result should therefore be compared with:
- the original photograph;
- measured drawings;
- actual site conditions;
- physical material samples;
- advice from the appropriate design and construction professionals.
The most responsible description is not:
This is exactly what the finished room will look like.
It is:
This is one visual direction worth evaluating.
A More Useful Role for AI in Residential Design
The strongest use of AI in home design is not automatic decoration. It is structured iteration.
A practical early-stage workflow can be summarized as follows:
- Photograph or document the existing space clearly.
- Remove temporary visual clutter.
- Empty the room only when the project requires it.
- Explore several broad design directions.
- Select the most promising materials, colors, and arrangements.
- Refine individual details through focused edits.
- Compare room visuals with the floor plan.
- Use staging to communicate scale and possible function.
- Verify every important decision through measurements and professional review.
Used this way, ImagineMyHouse sits between the first idea and the expensive commitment.
It gives homeowners a clearer way to discuss preferences before purchasing furniture or materials. It helps designers communicate alternatives without building every early concept as a complete 3D scene. It gives property professionals a faster method for demonstrating the potential of visually distracting or vacant spaces.
The value is not that every generated image is final.
The value is that more ideas can become visible early enough to compare, question, and improve.