Have you experimented with Google’s Veo 3 model yet? The visuals are undeniably impressive, but the audio often needs a little more depth to feel cinematic. Filmora solves this by integrating the Veo 3 AI Video Generator directly into its editing workspace, so you can create, enhance, and finalize your clips without juggling multiple tools. The entire process, from generating your Veo 3 video to polishing the soundtrack, happens inside one clean interface.
If you want to refine the audio in your Veo 3 AI videos and give them a more cinematic finish, this guide walks you through the complete workflow inside Filmora Veo 3.
Part 1: What Makes Filmora Veo 3 Perfect for AI Video Audio Editing
The Veo 3 AI Video Generator with Audio by Google is changing how creators bring ideas to life. With nothing more than a text prompt, it can produce a polished, cinematic clip in minutes. The visuals already feel incredibly natural, but the audio that comes with these generated clips often sounds soft, flat, or incomplete.
The ideal companion in this situation is Wondershare Filmora. With Filmora Veo 3, you have complete control over your audio, resulting in a story that is more polished, clear, and rich. Its clean interface and AI-powered enhancements make it easy to shape your sound without getting stuck in complicated workflows.
Key reasons to use Filmora Veo 3 for audio editing:
- AI-Powered Tools: Quickly clean, balance, and enhance your voice or background audio.
- Multi-Track Editing: Stack narration, music, and effects for a full, layered mix.
- Integrated Voice Recording: Capture or import voiceovers directly inside the editor.
- AI Beat Detection: Match cuts and transitions to your music’s rhythm effortlessly.
- Cinematic Sound Effects: Add movement, atmosphere, and emotional depth to your scenes.
With Filmora Veo 3, your Veo 3-generated videos don’t just look cinematic, they sound immersive, powerful, and ready for publication.
Part 2: How to Add and Edit Audio in Veo 3 AI Videos
In case you want to add a voice after creating your visuals with the Veo 3 AI Video Generator with Audio, you can do it easily. Using Filmora Veo 3 makes it easy to add, alter, and improve the sound in AI videos, and the result is a more visually and emotionally appealing video for viewers.
Just implement these easy steps to complete the AI-generated clip transformation process and get your movies ready for the big screen.
Step 1: Start by Creating Your Base AI Video Directly Within Filmora Veo 3
Open Filmora Veo 3 and begin by generating your AI video using the built-in Veo 3 AI Video Generator. Enter your prompt, choose your visual style, and let Filmora produce your scene, whether it’s a cinematic landscape, product montage, or storytelling sequence.
Once the video renders, you can either keep the AI-generated audio or move forward with a clean soundscape for full customization.
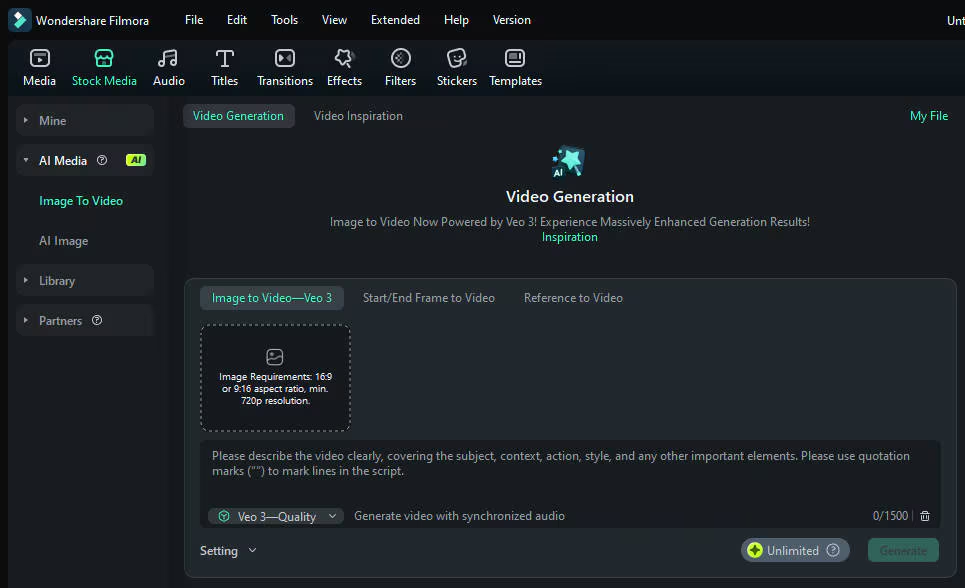 Export without audio if you plan to redesign the soundscape completely in Filmora.
Step 2: Import or Open the Clip in Your Editing Timeline
If you generated the clip externally or re-imported it, drag your Veo 3 video into Filmora’s timeline. Filmora supports all major formats, and its frame-accurate viewer helps you sync audio and visuals with precision.
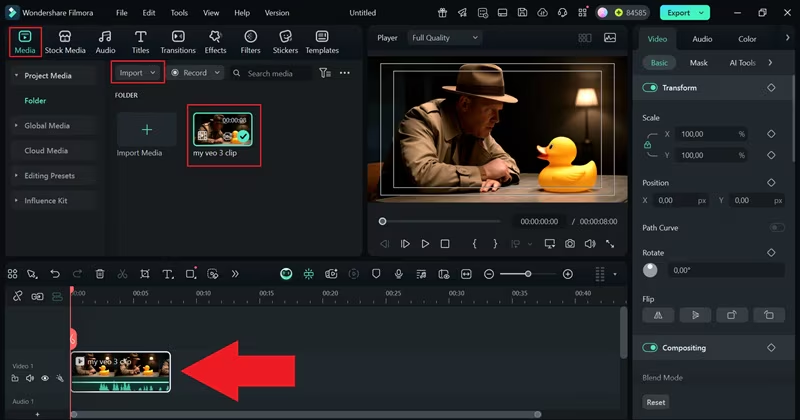 From here, you can view your video frame-by-frame, making it easier to sync every sound and transition perfectly.
Step 3: Add Audio Tracks, Music, or Voiceovers
Here’s where the fun begins. With Filmora, you can mix as many audio layers as you want, be it music, sound effects, voiceover, or ambient background tracks, to fit the mood of your video.
Filmora lets you add multiple audio layers, music, sound effects, voiceovers, or ambient background tracks to match your video’s tone.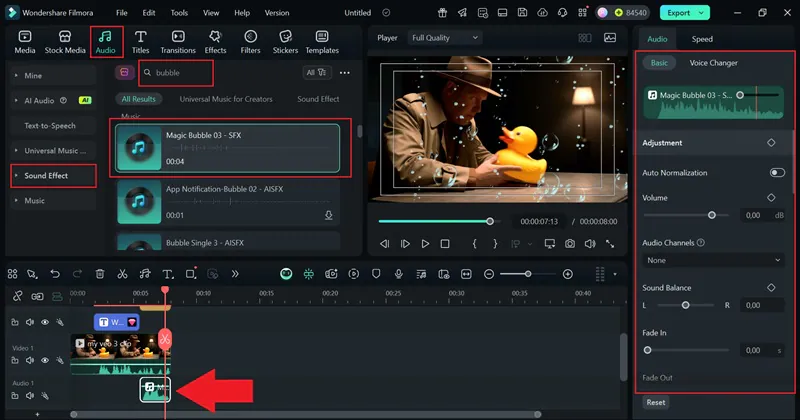
There are multiple ways to add voice with Filmora.
- Background Music: Choose from Filmora’s built-in royalty-free library or import your own soundtrack.
- Voiceover: Record narration directly in Filmora or sync a pre-recorded audio file.
- Sound Effects: Layer ambient sounds (like wind, footsteps, or city noise) to add realism.
Each element appears as a separate track in the timeline, making it easy to control timing and transitions.
Step 4: Enhance Audio Using Filmora’s AI Tools
One of the standout features of Filmora Veo 3 is its AI-driven sound enhancement tools. These features automatically detect issues and help polish your audio for a studio-quality finish.
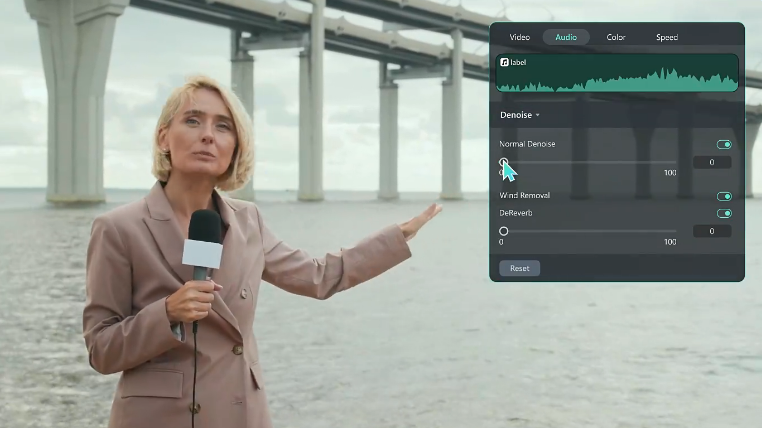 Must try these audio-enhancing features to make your Veo 3 videos more realistic.
- AI Audio Denoise: Removes background hiss, static, or unwanted ambient sounds.
- AI Voice Enhancer: Smooths out narration and improves vocal clarity.
- Audio Ducking: Automatically lowers background music when someone speaks.
- AI Beat Detection: Aligns your visuals with the rhythm of the background music for perfect synchronization.
These smart tools make sound editing feel effortless, even if you’re not a professional sound designer.
Step 5: Mix, Balance, and Export for Different Platforms
After you have positioned all your audio components, then mixing and balancing will be your next step. Adjust frequencies with Filmora’s internal equalizer and ensure that your music, effects, and voice-over are all mixed to a similar volume level.
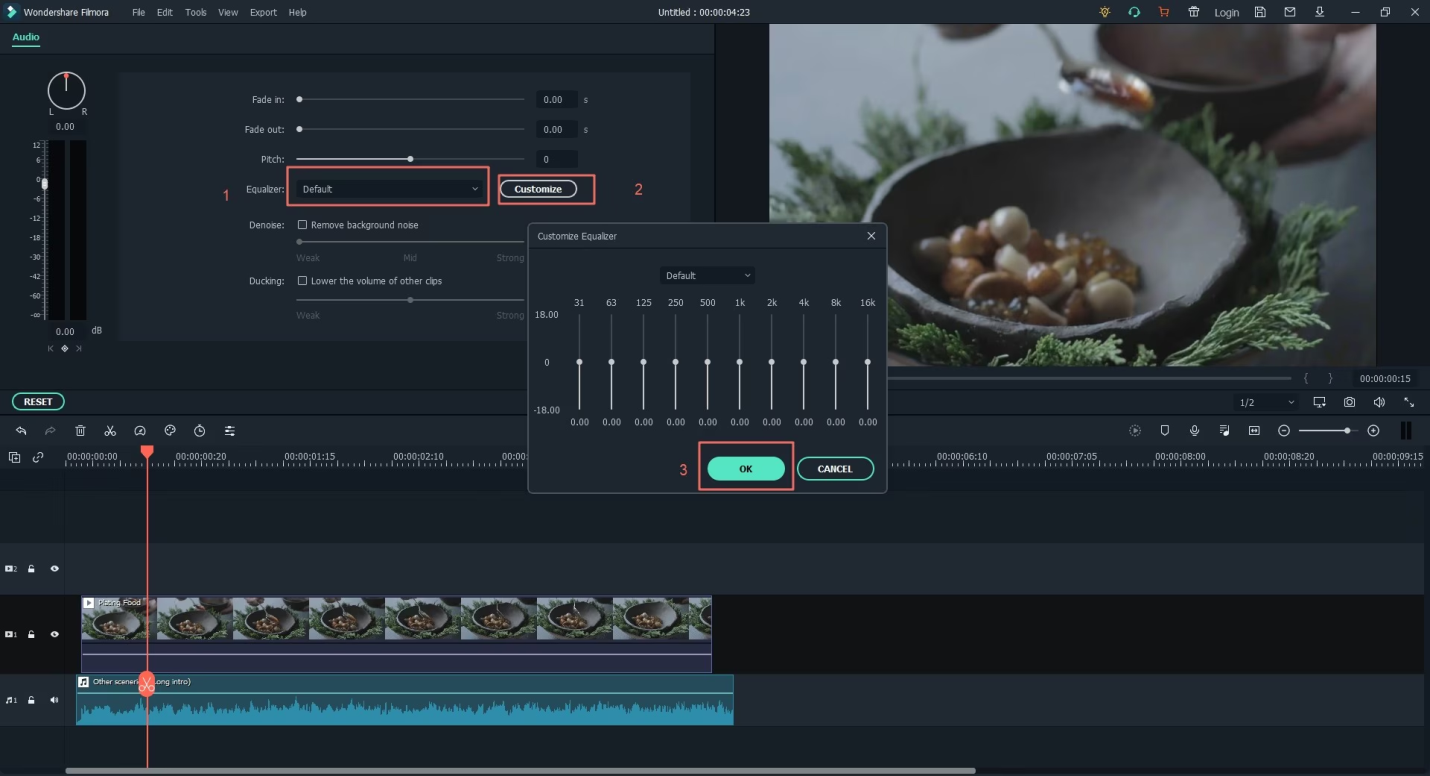 Adjust volume levels, fade in or out where needed, and preview your project in real time. Filmora’s clean interface gives you a crystal-clear view of your waveform, making it simple to spot inconsistencies.
When you’re happy with the final mix, export your Veo 3 AI video in the format and resolution best suited for your platform, be it YouTube, Instagram, or your website. Filmora offers export presets optimized for each platform to save you time.
Part 3: Creative Tips for Cinematic Sound Design
After you have edited and synced your Veo 3 AI video, enhance it further with a cinematic sound design that attracts the audience. Consider these quick tips at Filmora Veo 3 :
- Blend Ambient Sounds: Bring in multiple layers of very quiet background sounds of nature or the city, for example, to give a more realistic feel to your video.
- Add Storytelling Voiceovers: Employ Filmora’s AI Voice Modulator or use the recording method to emotionally connect the viewer.
- Match Music with Emotion: You can make your music more dramatic or lighter depending on the feeling or the speed of the scene.
Just with these small additions, your Veo 3 AI videos will be more engaging, have good sound levels, and be emotionally more powerful.
Conclusion
Filmora Veo 3 is the perfect complement to flawless visuals. It provides you with every essential tool to elevate your Veo 3 AI videos visually to the subsequent cinematic level, just by, for instance, naturally inserting live background sounds and adjusting the voiceover volume along with the music.
Do you want to try it out? Download Wondershare Filmora and start editing your first Veo 3 AI video today. Try out the new Filmora Veo 3 flow and find out how effortless it is to make your AI-generated stories look and sound great.